Getting Your Water Cart Working for the Site, Not Just the Job
A water cart that is set up properly does more work. It refills faster, suppresses dust more consistently and causes fewer interruptions to the rest of the site crew. A water cart that is set up without much thought tends to run dry at the wrong moment, spray in the wrong direction and become the thing everyone blames when something goes wrong.
This guide covers the practical steps for setting up a water cart on a NZ construction or civil site, from pre-arrival planning through to end-of-day shutdown. It is written for site supervisors, owner-operators and anyone taking delivery of a water cart for the first time or setting up a new site configuration.
The guide applies to trailer-mounted units like the AquaMaster 2000 and to skid-mounted units like the AquaMaster 4000 and AquaMaster 6000. Where setup steps differ between trailer and skid models, both options are covered.
Before the Water Cart Arrives on Site
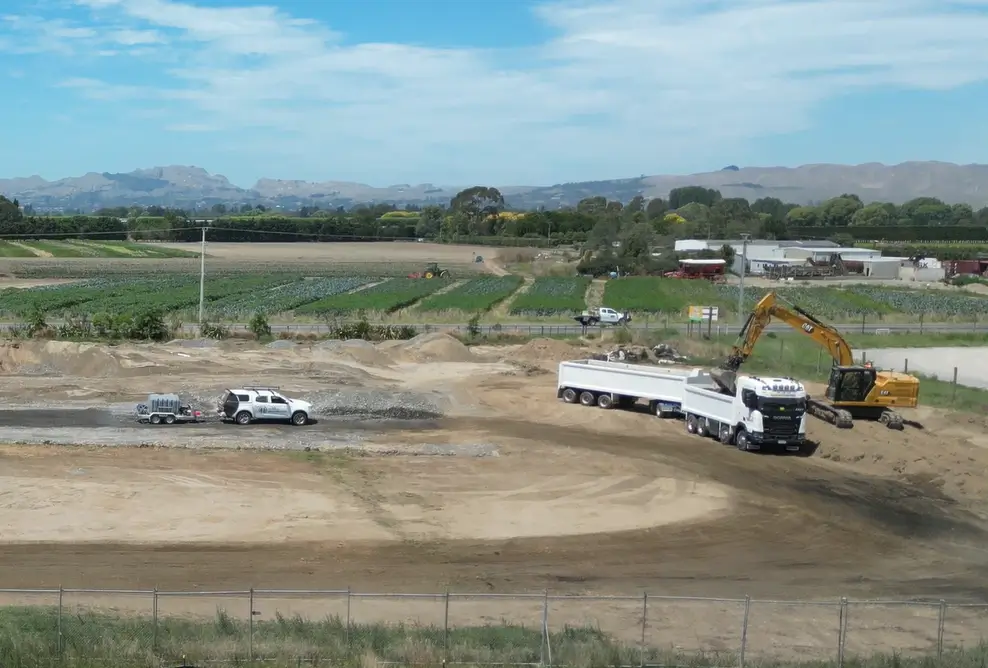
Good setup starts before the machine turns up. The first thing to sort is your water source. You need to know where you will fill the tank and how long each fill run takes. Options on NZ construction sites typically include a standpipe connected to the local water supply, a tanker parked on or near the site, a local stream or dam if consent allows, or a council hydrant with the appropriate standpipe fitting and camlock adapter.
If your water source is some distance from the work area, factor that travel time into your dust suppression plan. A 2,000L trailer running at a standard, intermittent dust suppression rate will typically stretch its water supply across 45 minutes to two hours depending on coverage area and conditions. If the fill point is a 20-minute round trip, you are losing significant productive time across a day. Knowing this before the machine arrives lets you plan the site logistics more effectively.
Also confirm access. A trailer water cart needs a clear tow path to move around the site. A skid tank on a flat deck needs the truck to be able to reach the work area and return to the fill point without being blocked by other plant. On tight urban sites this limits your options more than it appears on paper.
Check that the site has the right fittings. All three AquaMaster models use camlock fittings for fast refill connections, which is the NZ industry standard. If your standpipe or tanker outlet uses a different fitting or has none at all, sort the adapter before the water cart is on site to avoid having your crew standing around waiting.
Positioning for Dust Suppression
For dust suppression, starting position matters. Always position or drive the water cart upwind of the dust source where possible. This allows the natural airflow to carry the water mist across the entire target area, maximising your coverage and drop-out rate. Spraying directly into a heavy headwind has the opposite effect: it forces the water mist backward, coating your tow vehicle or truck and reducing the effective reach of your spray bar. For more detail on dust suppression techniques and compliance requirements, see our guide to best water carts for dust suppression on NZ construction sites.
On roading sites where the water cart is moving with traffic, the integrated dust suppressio n nozzles on the AquaMaster 4000 and AquaMaster 6000 are designed to spray from the rear of the unit as it travels. The optional remote on/off switch available on these models lets the driver control water flow from inside the cab, which is useful when you need to stop spraying at intersections, in areas where wet roads create a hazard, or when passing through occupied sections of a site.
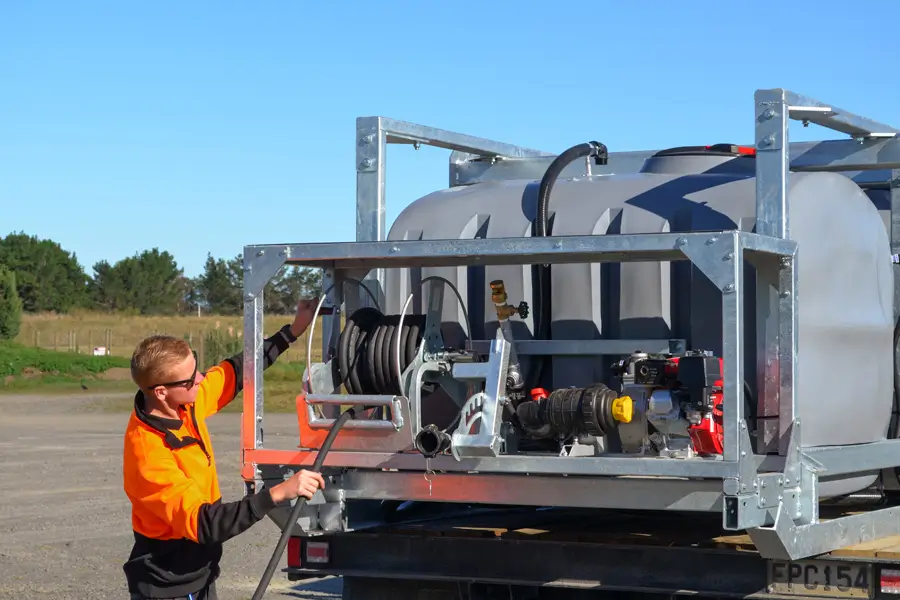
On larger earthworks sites where the dust source is a fixed area, park the water cart so the operator can walk the hose to the edges of the dusty zone rather than moving the unit repeatedly. The AquaMaster 2000 comes as standard, with extended lengths available as an optional extra, with a 25m low-pressure hose and a 30m high-pressure hose, which covers a reasonable working radius before you need to reposition the trailer.
Connecting to Your Water Source
All three AquaMaster models use camlock fittings for refilling. At typical NZ standpipe pressures, a 2,000L tank fills in around 10 to 15 minutes with a standard 25mm supply (delivering roughly 150–200 L/min). A 4,000L or 6,000L tank will take proportionally longer. If fill time is becoming a bottleneck on a busy site, talk to your water authority about a higher-flow connection (if you haven’t got one already) or consider a tanker for on-site top-ups.
The AquaMaster 2000 also features a built-in overhead refill hose designed for safe, compliant filling from municipal water supplies or standpipes. Rather than forcing the operator to climb the trailer, it features a convenient camlock fitting at ground level for easy connection. The external plumbing delivers water to the top of the tank through a certified physical air gap, preventing any potential for water siphoning back into the water source and ensuring full compliance with NZ council backflow prevention requirements on site.
If you are connecting to a council hydrant, you will need an approved standpipe with a camlock adapter. Check with your local authority before the job starts. Some councils require a metered standpipe permit for construction water takes, and being caught taking water without the right authority can result in significant fines.
Setting Up for High-Pressure Washing
If you are using the water cart for high-pressure washdown, the setup is different from dust suppression. The AquaMaster 2000 runs a dedicated water blaster pump powered by a Honda GX690 engine. This is a separate system from the flood jet pump, so you can switch between high-pressure cleaning and high-volume delivery without changing hoses or nozzles.
Before starting the water blaster, check that the tank has enough water for the task. The blaster uses up to 30L per minute, meaning a full 2,000L tank easily provides at least an hour of standard, intermittent high-pressure cleaning. For longer jobs, plan refill breaks into your work schedule rather than running the pump close to empty, which can cause cavitation and shorten pump life.
The 30m high-pressure hose included as standard is long enough to reach most drainage culverts, concrete surfaces and machinery cleaning areas without moving the trailer. Choose the nozzle appropriate for the task. A narrow fan nozzle gives maximum pressure for stripping grime from hard surfaces. A rotary turbo drain cleaning nozzle, available as an optional extra, works exceptionally well for culvert clearance, delivering the high impact pressure and wide cutting pattern needed to blast through packed silt and debris.
Hot Works Support: What to Set Up and Where
On sites where hot works are being carried out, including grinding, welding, cutting and any work that generates sparks or heat near combustible materials, a water cart positioned nearby is typically a WorkSafe requirement. The water cart serves as the on-site water supply for fire watch and emergency suppression.
For hot works support, position the AquaMaster 2000 within easy reach of the hot works area with the high-flow washdown hose unreeled and ready for immediate deployment. Because volume is critical for fire suppression, the high-flow pump is your primary tool here. Ensure the operator or designated fire watch is briefed on the engine startup procedure before work begins, and confirms the adjustable nozzle which is permanently attached to the hose end is set to the correct spray pattern.
Do not leave the water cart running unattended during hot works. The fire watch needs to be physically present and alert for the duration of the activity, plus the period specified by your site safety plan after hot works cease. This is typically 30 to 60 minutes depending on the materials involved and the site environment.
If your site requires the water cart to serve both dust suppression and hot work support simultaneously, the AquaMaster 2000‘s dual pump configuration means both functions are independently available. The high-flow flood jet pump handles dust suppression while the water blaster remains independently available for any high-pressure cleaning requirement. Make sure both pumps have fuel before the shift starts.
End-of-Day Shutdown and Basic Maintenance
Proper shutdown extends the life of the water cart and prevents issues the following morning. At the end of each day, drain any residual water from the hoses if you are working in conditions where overnight frost is a risk. Wipe down the pump housings and check for any leaks around hose connections and camlock fittings. Small leaks that look minor at the end of a shift can become significant by the morning.
For the high-pressure pump, shut off the engine first, then squeeze the water blaster gun trigger or open the washdown valve to bleed off any residual line pressure safely. Do not run the engine with the water supply closed, as this will damage the pump immediately. This prevents pressure buildup in the hose overnight and reduces wear on the pump seals.
Check fuel levels on both pump engines at the end of the day and refuel so the machine is ready at the start of the next shift. Running out of fuel during active dust suppression on a windy morning is avoidable and disrupts the whole crew.
Any issues with the pump, hoses or fittings are worth addressing at the end of the day rather than the start of the next one. A water cart that is not working at 7am on a dusty summer site is a bigger problem than one that needs a small fix at 5pm.
For full servicing requirements and recommended maintenance intervals, refer to the operator manual for your specific model. For any questions about setup, maintenance or which AquaMaster model suits your site requirements, view the full specifications for the AquaMaster 2000, AquaMaster 4000 or AquaMaster 6000 or talk to our team directly.